Documentation
Workfleet - React Native APP For Workrep Freelance Marketplace
Thank you so much for purchasing our item from Codecanyon.
- Version: 1.0.1
- Author: AmentoTech
- Created: 28 Oct, 2024
- Update: 28 Oct, 2024
If you have any questions that are beyond the scope of this help file, Please feel free contact us at Item Support Page.
What is Workfleet
WorkFleet is a React Native application designed for the Workreap freelance marketplace, enhancing the platform’s functionality by providing a streamlined, mobile-focused experience. The app facilitates connections between freelancers and clients, supporting features like project management, communication, and payment processing, optimized for on-the-go usage.
Installation
Downloading
Thank you for choosing the Workfleet App! To get started, please log in to your codecanyon account. Once you're logged in, navigate to the "Downloads" section where you'll find all your purchased items. Locate the Workfleet App in the list and click on the "Download" button to access your files.

Upon downloading the zip package file from Codecanyon, you'll have all files you need inside. Zip package contains the following files
Files in main-files.zip
- workfleet.zip - APP Source code
- workreap-api.zip - WordPress Plugin
- documentation.zip - Documentation
Prerequisites
Before beginning, ensure that your development environment meets the following requirements:
- Node.js: Download and install Node.js from nodejs.org. LTS versions are recommended.
- React Native CLI: For development and debugging, you’ll need the React Native CLI.
- Android Studio: for Android development
- Xcode: for iOS development
Installation
Follow these steps to set up your development environment and install the necessary components:
Step 1: If you've already installed these, that's great! If not, please proceed to install them:
- brew install yarn
- brew install node (LTS version)
- brew install watchman
- brew tap AdoptOpenJDK/openjdk
- brew cask install adoptopenjdk17
Step 2: Install and Activate Workreap API plugin in your WordPress site
Step 3: Extract workfleet.zip
Step 4: Open workfleet in code editor
For support: you can send email at help.amentotech@gmail.com
To use this app you must have visual studio code already installed. For more information regarding installing the visual studio code, please visit
Tip: To use this app you must have visual studio code already installed. For more information regarding installing the visual studio code, please visit Visual Studio Code After Installing visual studio code, simply unzip app source code .zip file and open source code in visual studio code.
App Configuration
Follow these steps to configure the app in code editor. Start by installing the necessary Node modules and iOS pod files.
Step 1: Open project in code editor.
Please run commands:
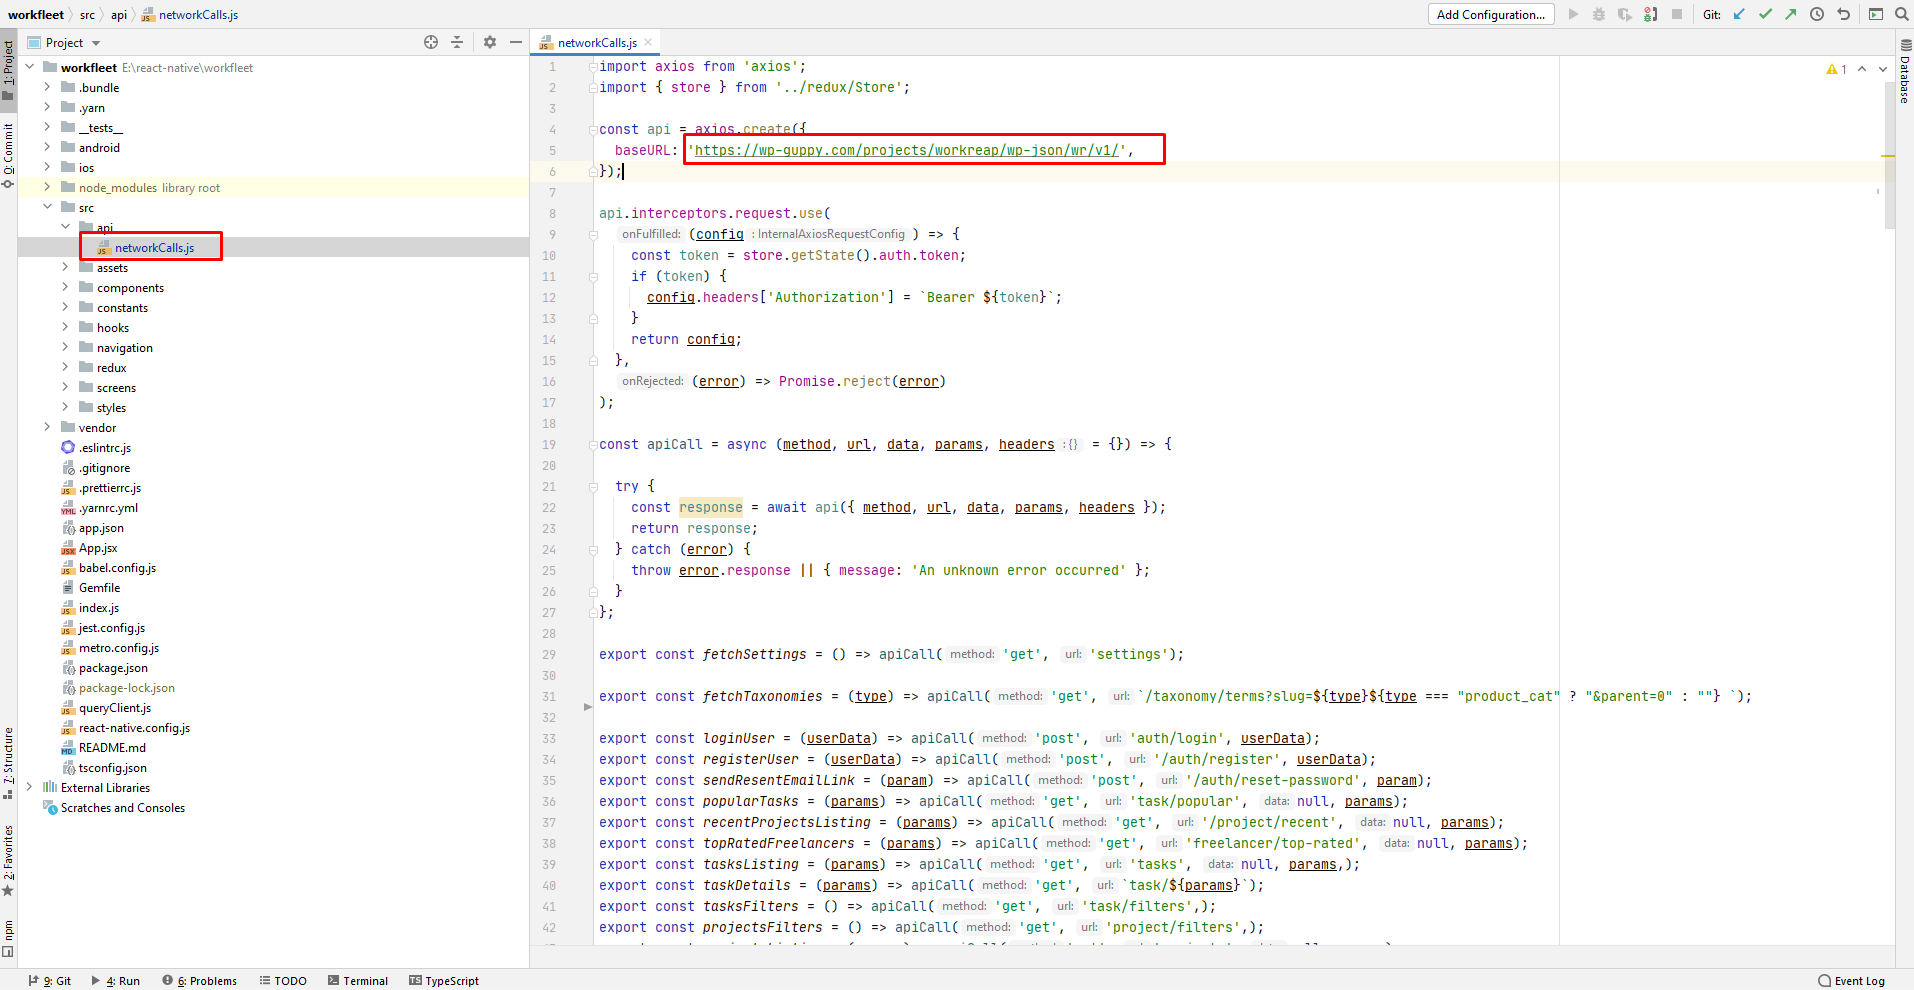
npm i --force cd ios pod install cd android ./gradlew clean Step 2: Open networkCalls.js file under src/api folder. Make sure Workreap API plugin installed and activated on your site.
Step 3 for Android: After configure every thing for Android run this command in terminal.
npx react-native run-andorid
Step 4 for IOS: Download Xcode from App store in IOS to test the app on ios device. open ios/yourapp.xcworkSpace file in Xcode and run the project on device

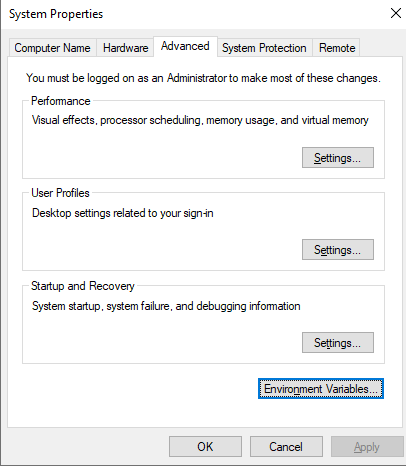
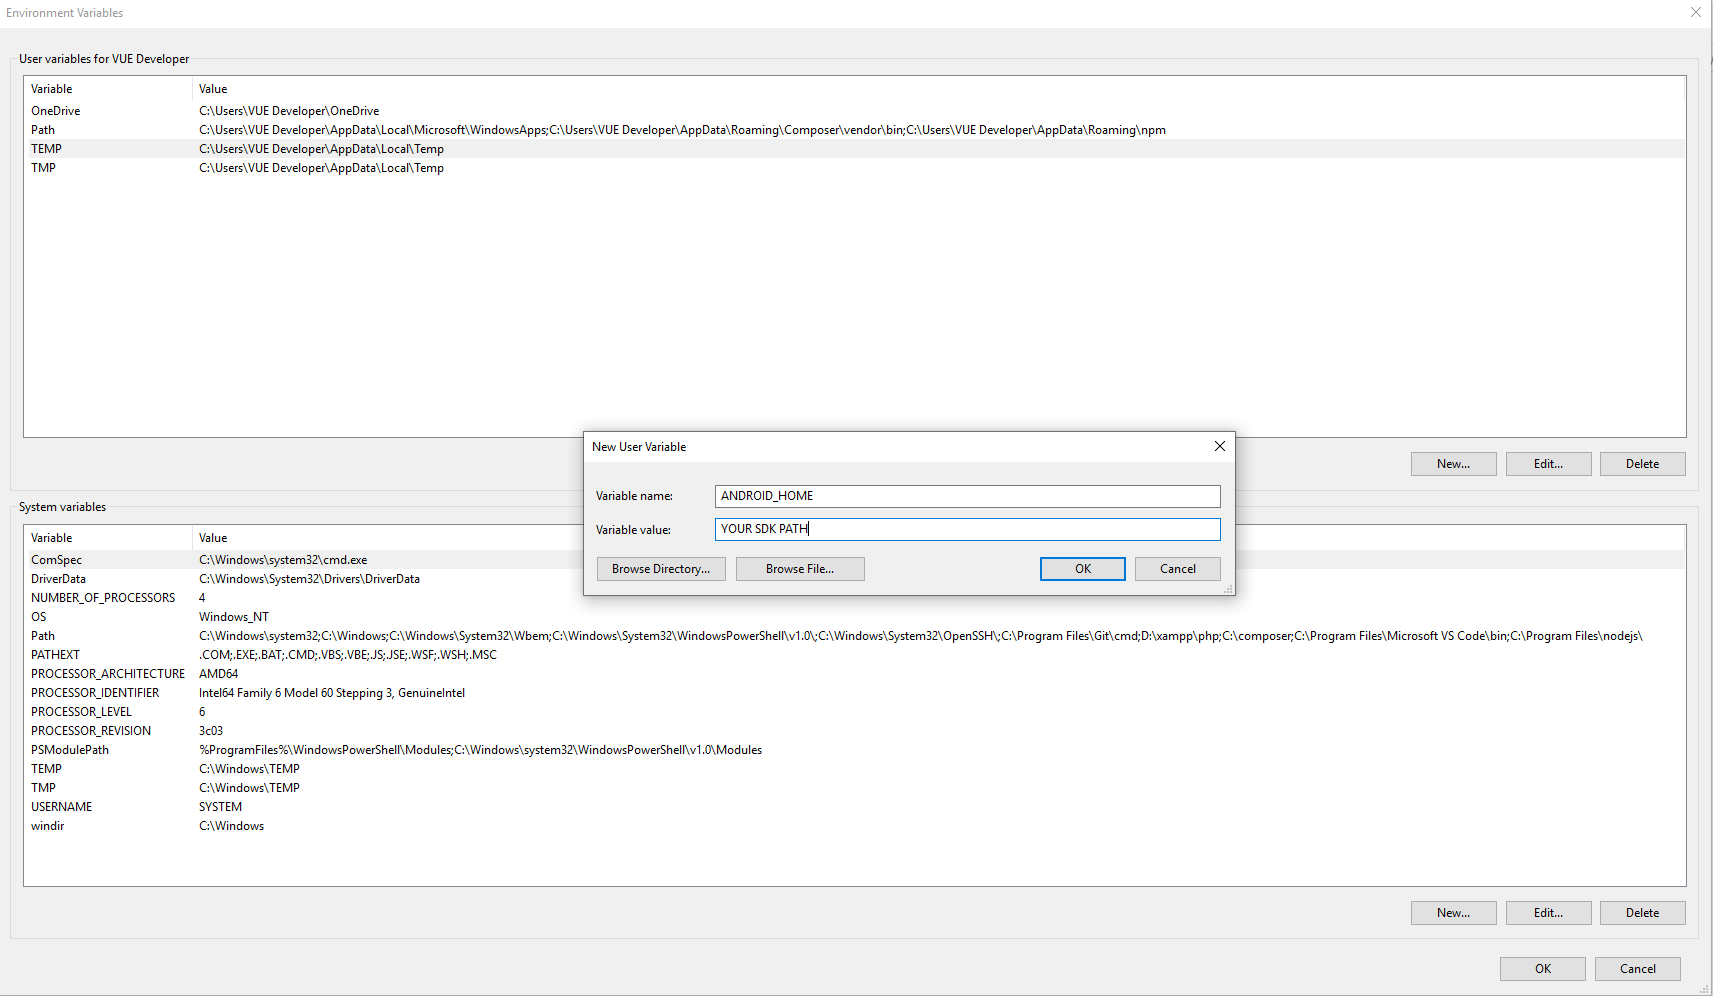
Step 5:Setting ANDROID_HOME environmental variable on Windows
- Where the Android-SDK is installed depends on how you installed it.
- You have to open Environment Variable and add Android Sdk path there
Step 6: Setting ANDROID_HOME environmental variable on MacOS
- Open or create the .zshrc file in your home directory:
nano ~/.zshrc - Add the following lines to the end of the file:
export ANDROID_HOME=/Users/your-username/Library/Android/sdkNote: Replace your-username with your actual macOS username and save changes.
General Settings
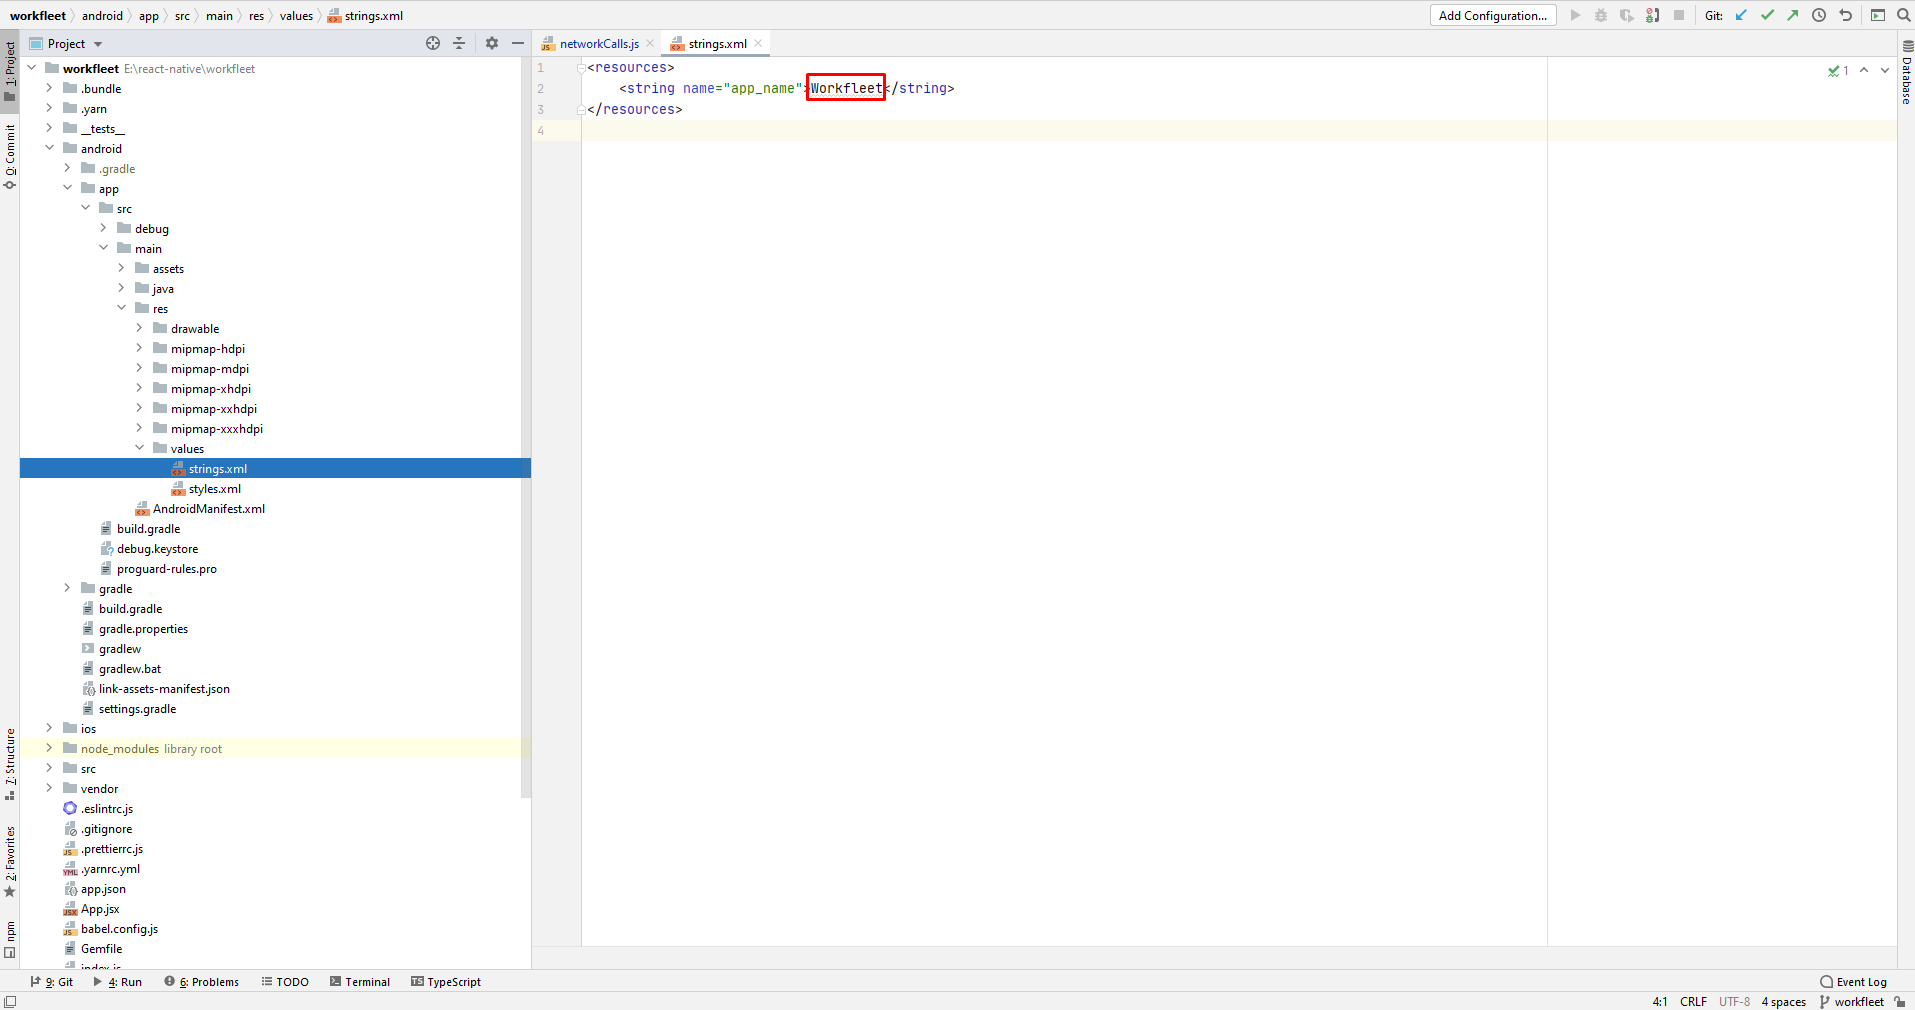
Set name for Android: To change app name, open android\app\src\main\res\values\strings.xml file and replace app_name key value.
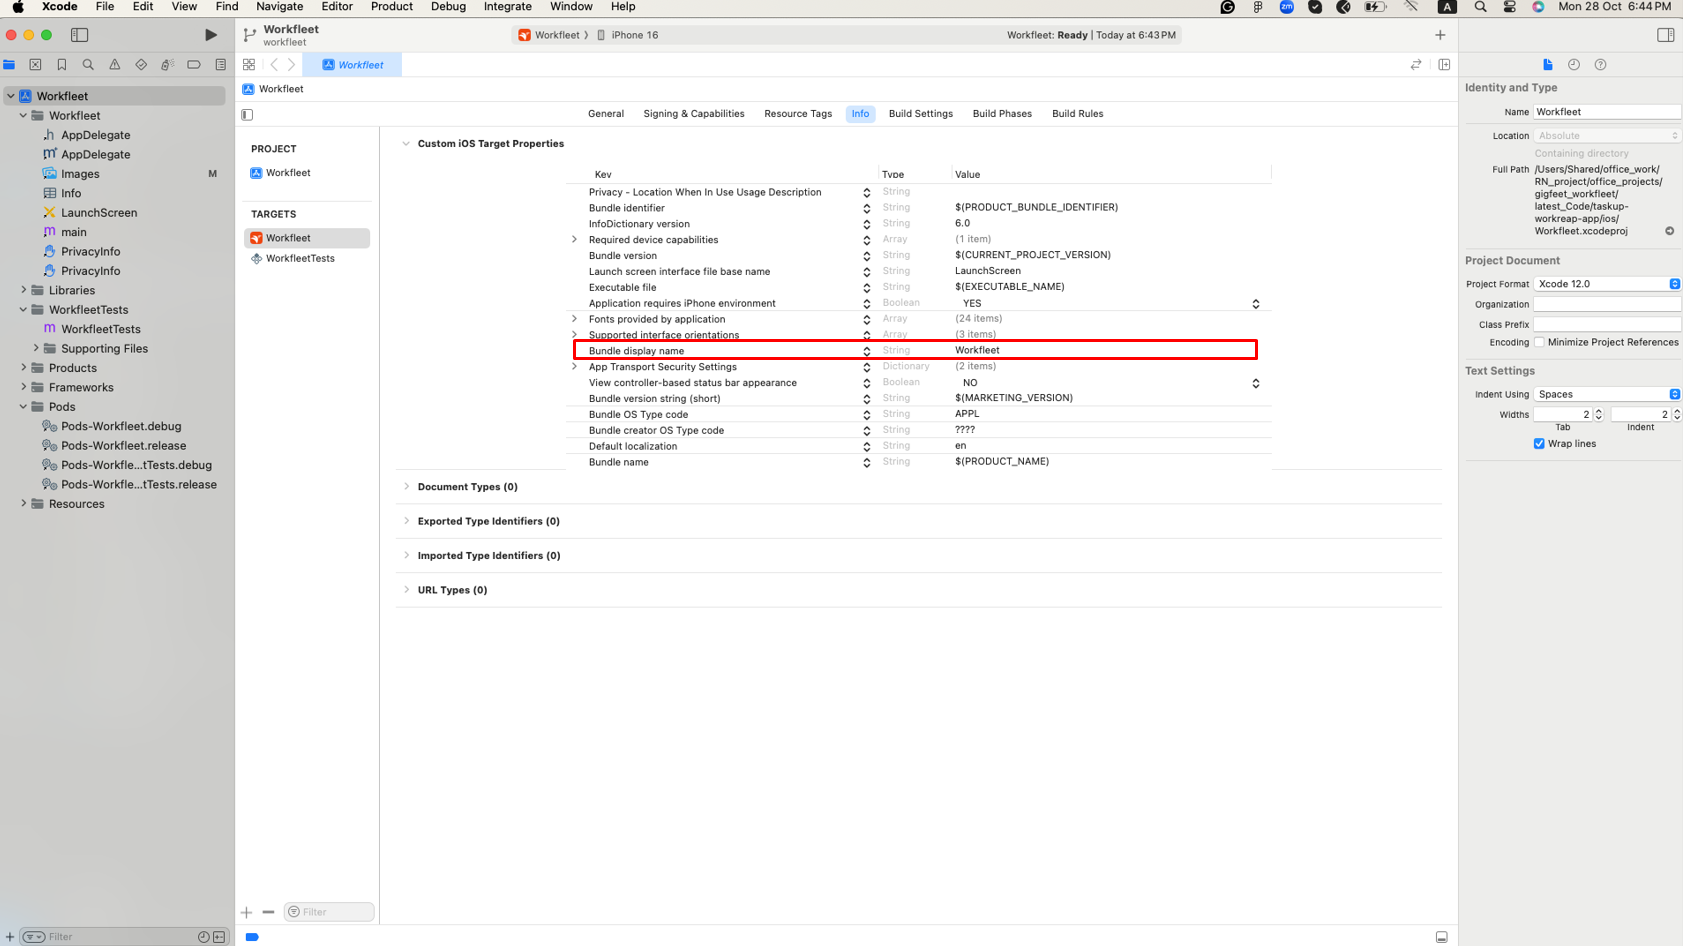
Set name for IOS:To change app name, open Xcode under info section
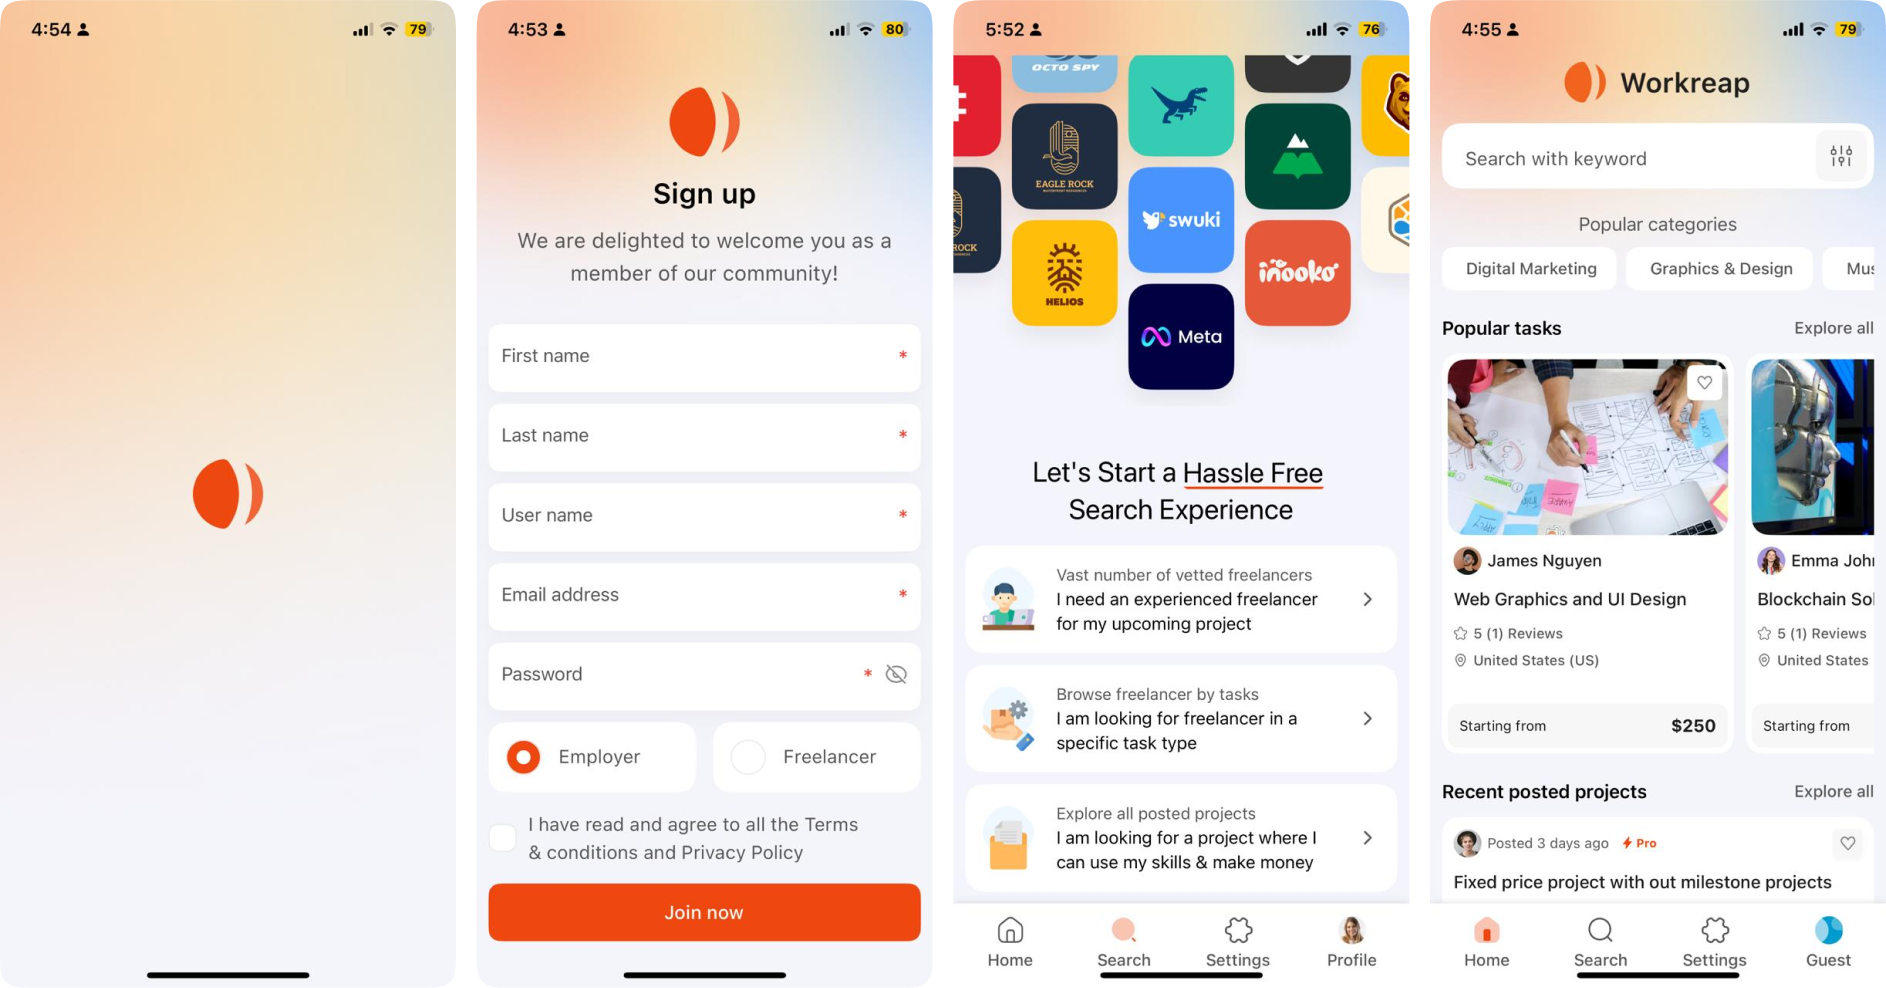
Change Icon & Logo: You can change the app icon and logo through the WP Admin -> WR Setting -> Mobile APP Settings. Upload your new icon, logo, and search banner as needed.
Here is an updated preview of the app icon, logo, and search banner:
Change Color Scheme: You can also customize the color scheme through the WP Admin -> WR Settings -> Style Settings.

Change App Icon for Android: To change app icon, go to android/app/src/main/res/mipmap and replace all mipmap images with your logo
Change App Icon for Ios: To change the application icon for the iOS replace all the content of downloaded makeappicon zip of IOS folder. Go to Xcode YourProject -> Images.xcassets -> Replace all Images from the downloded folder by drag and drop.
Change package name fot android: You can modify app name in file
android/app/src/main/res/values/strings.xml
Then you can modify package name in files
android/app/src/main/java/com/reactNativeSampleApp/MainActivity.java
android/app/src/main/java/com/reactNativeSampleApp/MainApplication.java
android/app/src/main/AndroidManifest.xml
android/app/build.gradle
Lastly, run the following commands
./gradlew clean
Release Build
For Android: You can generate build for Android run this command
$ keytool -genkey -v -keystore Workfleet.keystore -alias Workfleet-alias -keyalg RSA -keysize 2048 -validity 10000
Then you have to set the generated file my-release-key.keystore under android/app in your
project.
Edit the file ~/.gradle/gradle.properties as following
MYAPP_RELEASE_STORE_FILE=.keystore
MYAPP_RELEASE_KEY_ALIAS=-alias
MYAPP_RELEASE_STORE_PASSWORD=[YOUR PASSWORD]
MYAPP_RELEASE_KEY_PASSWORD=[YOUR PASSWORD]
Now edit android/app/build.gradle as following:
signingConfigs {
release {
if (project.hasProperty('MYAPP_RELEASE_STORE_FILE')) {
storeFile file(MYAPP_RELEASE_STORE_FILE)
storePassword MYAPP_RELEASE_STORE_PASSWORD
keyAlias MYAPP_RELEASE_KEY_ALIAS
keyPassword MYAPP_RELEASE_KEY_PASSWORD
}
}
}
buildTypes {
release {
signingConfig signingConfigs.release
}
}
react-native bundle --platform android --dev false --entry-file index.js --bundle-output android/app/src/main/assets/index.android.bundle --assets-dest android/app/src/main/res
then in terminal run this comamnd
cd android
./gradlew clean
./gradlew assembleRelease
you can find release apk file from android/app/build/outputs/Release folder in project
for PlayStore bundle
./gradlew bundleRelease
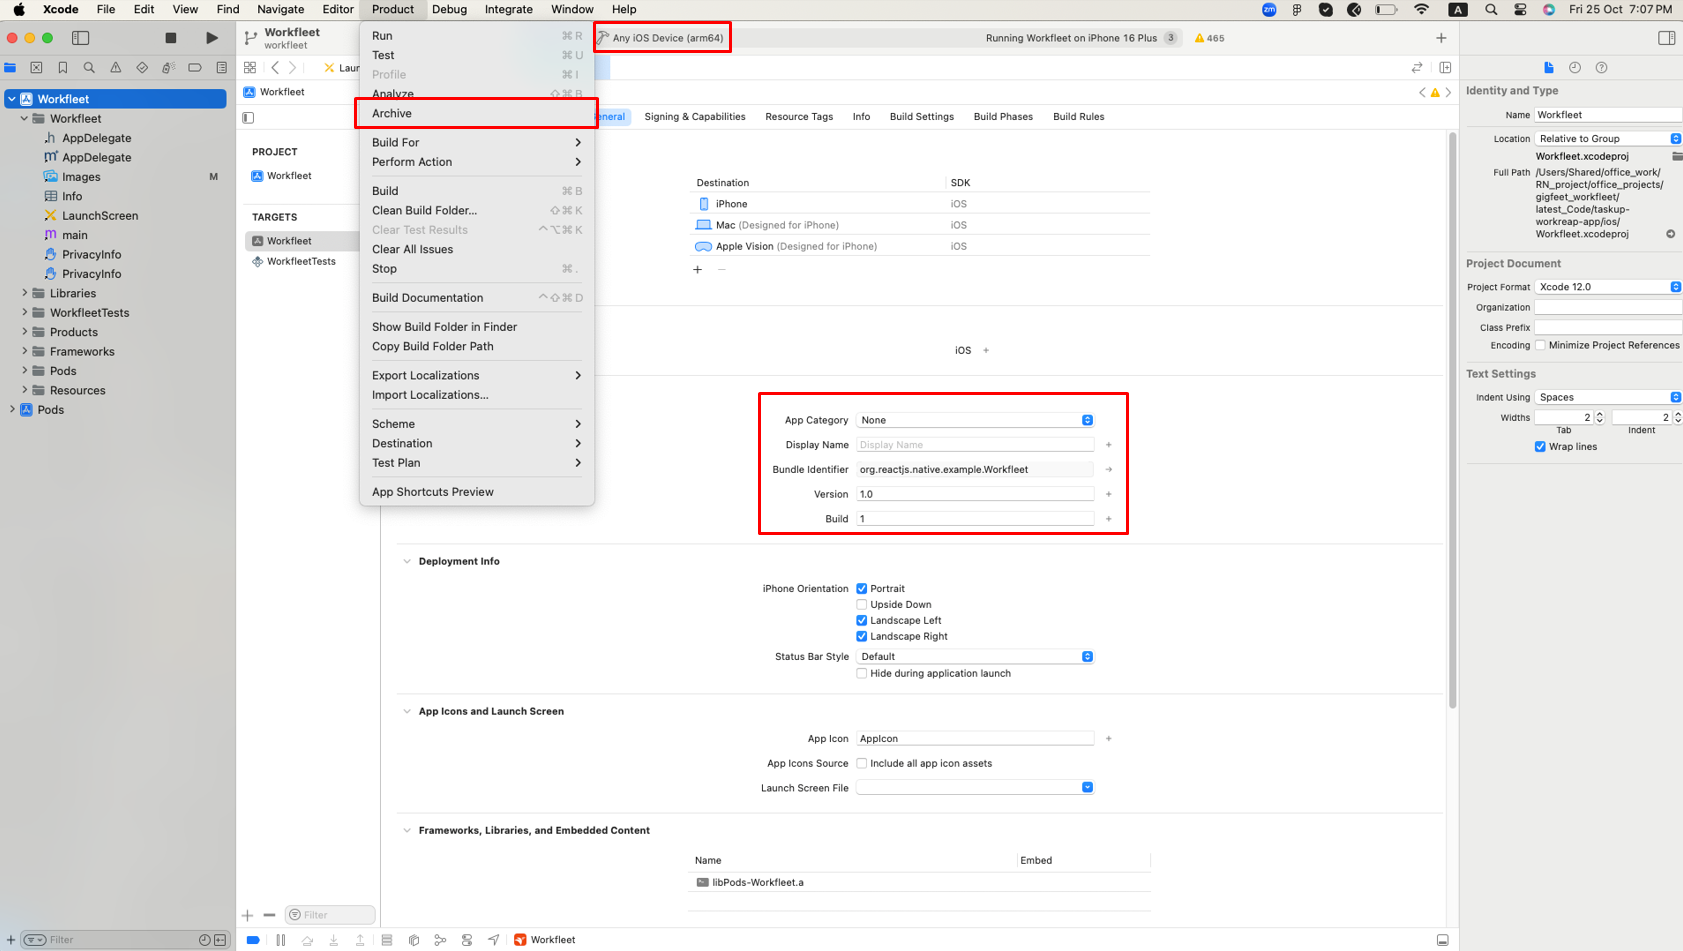
For Ios:You have to make some changes in Xcode. First you need to do purchase Apple Developer Account then after it go to your Xcode, select the Build device as Any iOS Device(arm64) and then open the tab of product/Archive after change version and build number for release.